


More from Ava Parker


More in Politics
Related Blogs


أرشيف
حصة الاجتماعي
Unlock Private Cloud Success: 5 Essential Steps to Optimize Your Microservices Package Today!
منشور من طرف Ava Parker
الجسم
In the current software development environment, microservices architecture has emerged as a prevalent method for creating applications. Generally, developers package microservices as container images using technologies like Docker, which are then uploaded to an image registry. For deploying these container images on orchestration platforms such as Kubernetes, Helm is the most widely used tool. Helm charts connect to public container registries to retrieve the necessary images.
However, some organizations operate their own private cloud infrastructures, where access to public container registries or the Internet may be restricted. To deploy applications in these environments, it is crucial to compile all required components—container images, Helm charts, documentation, and more—into a single archive. This article will guide you on how to package a microservices-based application for a private cloud, such as on-premises Kubernetes, and suggest methods to optimize the package size.
Creating a Package
The first step is to package the Docker images. Tag the images with the release version, for example, 1.2.3.
> docker tag <current repo>/image-name:tagname <appname>/image-name:tagname
> docker tag myrepo:5000/myimage1:1.2.3 myapp/myimage1:1.2.3
> docker tag myrepo:5000/myimage2:1.2.3 myapp/myimage2:1.2.3
Next, save all images into a single tarball.
> docker save --output <App Name>-images-1.2.3.tar <docker-images with tags>
> docker save --output myapp-images-1.2.3.tar myrepo:5000/myimage1:1.2.3 myrepo:5000/myimage2:1.2.3 <more images>
Finally, add Helm Charts and a README file to create a final compressed archive.
myapp-package-1.2.3.tgz
|_ _ _ _ _ _ myapp-1.2.3.tgz (helm chart)
|_ _ _ _ _ _ myapp-images-1.2.3.tar (docker images)
|_ _ _ _ _ _ Readme.txt (Contains checksums and installation instructions)
Installing the Package
To install the package, the user first extracts the tarball, loads the images into Docker, and can re-tag them as needed for their specific repository.
> docker load --input /root/myapp-images-1.2.3.tar
> docker tag myapp/myimage:1.2.3 <customer repo>/myimage:1.2.3
> docker push <customer repo>/myimage:1.2.3
To deploy the application using Helm, create a custom values file, `custom-values.yaml`, tailored to the customer’s environment, and execute the Helm install command.
> helm install -f custom-values.yaml myapp myapp-1.2.3.tgz
Optimizing Package Size
With the packaging structure established, the majority of the package size will come from Docker images. To verify the contents of the package, use the following command.
> tar -ztvf myapp-package-1.2.3.tgz
To reduce the overall package size, categorize Docker images into three groups:
1. Microservices developed with Java
2. Microservices created using other technologies, such as Python or NodeJS
3. Microservices obtained from external sources, where we lack control over the containerization process
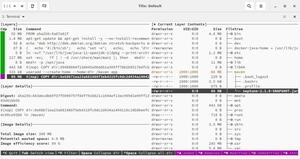
We will explore tools like distroless images, Jib, docker-slim, and dive to minimize image sizes and visualize our containerization process.
Containerizing Java Applications
A key goal when containerizing applications is to achieve the smallest possible image size. Smaller containers lead to:
- Faster pod startup times
- Quicker autoscaling
- Lower resource consumption
- Improved security
To create a Docker image, a Dockerfile is needed to define the image layers. For each microservice, we typically generate a fat jar that includes all dependencies. However, these dependencies are often duplicated across fat jars, wasting space. By utilizing Docker’s image layering, we can separate dependencies and resources into distinct layers, allowing for reuse and only updating the code for each microservice.
Google provides an open-source tool called Jib, which offers Maven and Gradle plugins to facilitate this process. Jib builds images without requiring a running Docker daemon, using the same standard output as `docker build` but without Docker unless specified.
Building Docker Image With Gradle
The first step is to update each project’s `build.gradle` file to include the new plugin:
groovy
plugins {
id 'com.google.cloud.tools.jib' version '2.2.0'
}
Next, integrate a customized Jib Gradle task to create the Docker image:
groovy
jib {
from {
image =
However, some organizations operate their own private cloud infrastructures, where access to public container registries or the Internet may be restricted. To deploy applications in these environments, it is crucial to compile all required components—container images, Helm charts, documentation, and more—into a single archive. This article will guide you on how to package a microservices-based application for a private cloud, such as on-premises Kubernetes, and suggest methods to optimize the package size.
Creating a Package
The first step is to package the Docker images. Tag the images with the release version, for example, 1.2.3.
> docker tag <current repo>/image-name:tagname <appname>/image-name:tagname
> docker tag myrepo:5000/myimage1:1.2.3 myapp/myimage1:1.2.3
> docker tag myrepo:5000/myimage2:1.2.3 myapp/myimage2:1.2.3
Next, save all images into a single tarball.
> docker save --output <App Name>-images-1.2.3.tar <docker-images with tags>
> docker save --output myapp-images-1.2.3.tar myrepo:5000/myimage1:1.2.3 myrepo:5000/myimage2:1.2.3 <more images>
Finally, add Helm Charts and a README file to create a final compressed archive.
myapp-package-1.2.3.tgz
|_ _ _ _ _ _ myapp-1.2.3.tgz (helm chart)
|_ _ _ _ _ _ myapp-images-1.2.3.tar (docker images)
|_ _ _ _ _ _ Readme.txt (Contains checksums and installation instructions)
Installing the Package
To install the package, the user first extracts the tarball, loads the images into Docker, and can re-tag them as needed for their specific repository.
> docker load --input /root/myapp-images-1.2.3.tar
> docker tag myapp/myimage:1.2.3 <customer repo>/myimage:1.2.3
> docker push <customer repo>/myimage:1.2.3
To deploy the application using Helm, create a custom values file, `custom-values.yaml`, tailored to the customer’s environment, and execute the Helm install command.
> helm install -f custom-values.yaml myapp myapp-1.2.3.tgz
Optimizing Package Size
With the packaging structure established, the majority of the package size will come from Docker images. To verify the contents of the package, use the following command.
> tar -ztvf myapp-package-1.2.3.tgz
To reduce the overall package size, categorize Docker images into three groups:
1. Microservices developed with Java
2. Microservices created using other technologies, such as Python or NodeJS
3. Microservices obtained from external sources, where we lack control over the containerization process
We will explore tools like distroless images, Jib, docker-slim, and dive to minimize image sizes and visualize our containerization process.
Containerizing Java Applications
A key goal when containerizing applications is to achieve the smallest possible image size. Smaller containers lead to:
- Faster pod startup times
- Quicker autoscaling
- Lower resource consumption
- Improved security
To create a Docker image, a Dockerfile is needed to define the image layers. For each microservice, we typically generate a fat jar that includes all dependencies. However, these dependencies are often duplicated across fat jars, wasting space. By utilizing Docker’s image layering, we can separate dependencies and resources into distinct layers, allowing for reuse and only updating the code for each microservice.
Google provides an open-source tool called Jib, which offers Maven and Gradle plugins to facilitate this process. Jib builds images without requiring a running Docker daemon, using the same standard output as `docker build` but without Docker unless specified.
Building Docker Image With Gradle
The first step is to update each project’s `build.gradle` file to include the new plugin:
groovy
plugins {
id 'com.google.cloud.tools.jib' version '2.2.0'
}
Next, integrate a customized Jib Gradle task to create the Docker image:
groovy
jib {
from {
image =


تعليقات