Body
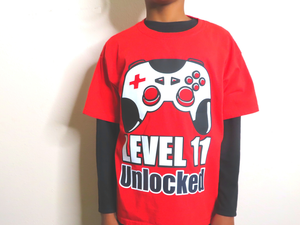
Making custom shirts is a fantastic way to celebrate special occasions, and with the help of a Cricut machine, it’s easier than ever. Layering Heat Transfer Vinyl (HTV) can add depth and flair to your designs, making your custom shirts stand out. In this guide, I will share how I created a custom shirt for my son’s 11th birthday, combining creativity and personalization.
The Inspiration Behind the Custom Shirt
Last month, my son celebrated his 11th birthday. Traditionally, I would purchase a custom shirt that matches the theme of his party from Etsy. However, this year, I decided to break from tradition and create something unique for him. Although we opted for a low-key celebration due to high COVID numbers in our area, the joy on my son’s face when he wore the shirt to the classic arcade we visited was priceless.
Designing Your Shirt
Setting Up Your Project
To get started, open the Cricut Design Space App and create a New Project. Click on “Images” and search for “controller.” Cricut offers a variety of free images, but I decided on a $0.99 option that perfectly fit my theme. Once you find the controller image, click “Add to Canvas.”
Adjusting Image Size
Next, drag the controller image until it reaches a width of about 11 inches. The exact size may vary based on the shirt you are using, so consider the dimensions of the fabric as it lays flat.
Customizing Colors and Text
Since I chose a red shirt for my son, I decided to change the colors of my images to black, white, and red. Click on the Text Box and type “LEVEL 11” in all caps to signify my son’s age. Choose a bold font like “Impact,” or feel free to select one that suits your style.
To give it a layered look, click on “Offset,” set the distance to 0.125, and click “Apply.” Select both layers of “LEVEL 11,” right-click, and choose “Group” so that they move together easily. Adjust the size to ensure it’s about 11 inches wide. Change the top layer color to white and the bottom layer to black.
Now, for the second text, type “UNLOCKED” in a new Text Box. Repeat the offset process, ensuring the distance remains at 0.125. Select both layers, group them, and size them to match the other text, making the top layer black and the offset white.
Centering the Design
To make sure everything is aligned, select the entire project, go to “Align,” and choose “Center Horizontally.” This step is crucial for a polished final product.
Cutting the HTV
Preparing for Cutting
Click on the “Make It” button. If you don’t have a Cricut membership, you’ll need to purchase the controller image before proceeding. Once you’re back on the “Make It” page, make sure to click “Mirror” for each page to reverse the images, as this is essential for heat transfer.
Loading the Vinyl
Lay the white iron-on vinyl on your Cricut Mat with the shiny side facing down. Use a Brayer tool to ensure it adheres well. Check that the dial on your Cricut machine is set to “Iron-On.” Press the “Go” button and let your machine work its magic!
After the cutting is complete, press the “Load/Unload” button to remove your vinyl. Use your Weeding Tool to carefully remove any excess vinyl from your designs. Repeat this process for the black and red vinyl.
Applying the HTV with EasyPress
Getting the Right Settings
To apply the HTV successfully, Google the Cricut Heat Guide and set your “Heat-Transfer Material” to “Everyday Iron-On” and your “Base Material” to “100% Cotton.” Click “Apply,” and you’ll find that your EasyPress should be set to 300 degrees for 15 seconds with firm pressure.
Final Application
With the temperature set, grab your red shirt (I used a Youth Large from Gildan), and place the layers of HTV on the shirt in the desired arrangement. Once pressed, allow the liner to cool before removing it. This careful process ensures your design adheres perfectly and looks professional.
Conclusion
Creating a custom layered HTV shirt using a Cricut machine is a rewarding experience that combines creativity with practicality. Not only did my son love his new shirt, but it also marked the beginning of a new tradition for our family. So, whether you're celebrating a birthday or any special occasion, designing a custom shirt can be a delightful project that leaves lasting memories.
Christmas Designs for Cricut , 3D Flower Cutting Designs , Christmas Monogram SVG for Cricut , Monogram Designs for Dancers , Fish-themed DIY projects


Comments